springboot整合mybatis流程详解
时间:2022-12-261.mybatis是什么
MyBatis 是一款优秀的持久层框架,它支持自定义 SQL、存储过程以及高级映射。MyBatis 免除了几乎所有的 JDBC 代码以及设置参数和获取结果集的工作。MyBatis 可以通过简单的 XML 或注解来配置和映射原始类型、接口和 Java POJO(Plain Old Java Objects,普通老式 Java 对象)为数据库中的记录。
2.整合
两种方式:
- 新建一个mybaits-config.xml文件,内容配置其中
- 在springboot核心配置文件application.yaml中,配置mybatis内容(这边只展示第二种)
2.0 前期工作:保证可以连接上数据库
导入依赖:
	<!--数据库启动器-->
   <dependency>
       <groupId>org.springframework.boot</groupId>
       <artifactId>spring-boot-starter-jdbc</artifactId>
   </dependency>

   <dependency>
       <groupId>mysql</groupId>
       <artifactId>mysql-connector-java</artifactId>
   </dependency>
spring:
datasource:
driver-class-name: com.mysql.cj.jdbc.Driver
username: root
password: xxx
url: jdbc:mysql://localhost:3306/mybatis
springboot中默认使用hikari连接池,号称最快的连接池。连接池还有DBCP,c3p0,druid…
2.1 导入依赖
<!--引入 mybatis-spring-boot-starter 的依赖-->
  <dependency>
      <groupId>org.mybatis.spring.boot</groupId>
      <artifactId>mybatis-spring-boot-starter</artifactId>
      <version>2.2.0</version>
  </dependency>
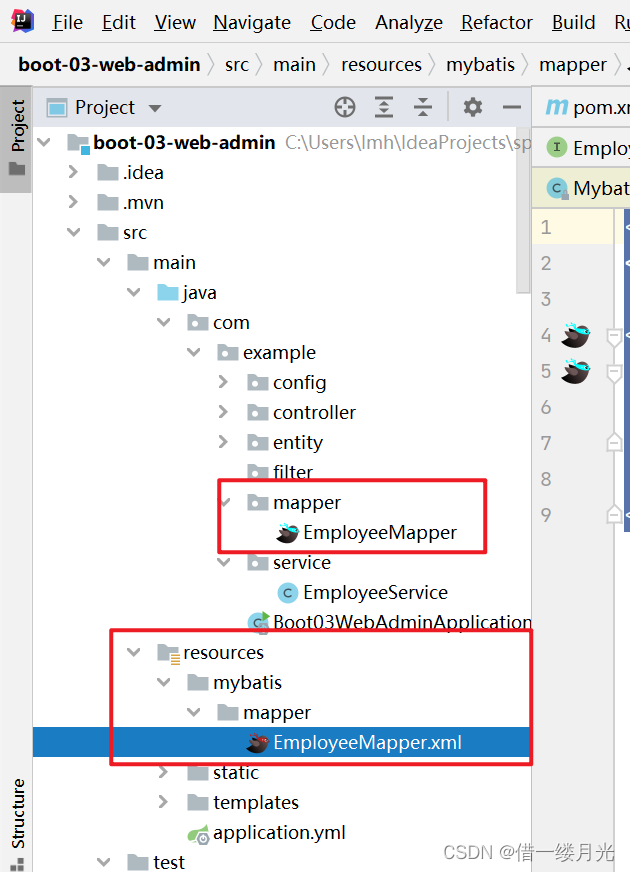
2.2 创建包和类

mapper层:
@Mapper
public interface EmployeeMapper {
    public Employee getEmpById(Integer id);
}
mapper层对应的xm文件:
<?xml version="1.0" encoding="UTF-8"?>
<!DOCTYPE mapper PUBLIC "-//mybatis.org//DTD Mapper 3.0//EN"
        "http://mybatis.org/dtd/mybatis-3-mapper.dtd">
<mapper namespace="com.example.mapper.EmployeeMapper">
    <select id="getEmpById" resultType="com.example.entity.Employee">
        select * from employee where id = #{id}
    </select>
</mapper>
2.3 在application.yaml配置mybatis
mybatis:
mapper-locations: classpath:mybatis/mapper/*.xml # 找到mapper层对应的xml文件
config-location: mybatis-config.xml # mybatis配置文件,resource目录下
mybaits的属性设置参考文档:https://mybatis.net.cn/configuration.html#settings
3.使用注解版mybaits
在mapper接口的方法上,使用注解增删改查@Update()、 @Insert()、 @Select()、@Delete()
@Insert("insert into employee (name,age,position) values(#{name},{age},#{position})")
void insert(Employee employee);
@Select("select * from employee where id = #{id}")
void selectById(Integerid);
4.实战过程
- 引入mybatis-spring-boot-start
- 配置application.yaml中,指定mapper-locations位置
- 编写mapper接口并标注@Mapper注解
- 简单方法直接使用注解
- 复杂方法编写在mapper.xml进行绑定映射
- @MapperScan(“com.lmh.mapper”)简化,该目录下的mapper接口就可不添加@Mapper注解
到此这篇关于springboot整合mybatis流程详解的文章就介绍到这了,更多相关springboot mybatis内容请搜索html5模板网以前的文章希望大家以后多多支持html5模板网!
相关文章
 SpringBoot整合MyBatis的代码详解这篇文章主要介绍了SpringBoot整合MyBatis笔记记录,大家需要注意在整合mybatis之前我们需要相对应的导入相关依赖,首先
 springboot读取nacos配置文件的实现SpringBoot注册服务到Nacos上,由Nacos来做服务的管理,本文主要介绍了springboot读取nacos配置文件的实现,文中通过示例代
 Springboot自动装配之注入DispatcherServlet的实现方法这篇文章主要介绍了Springboot自动装配之注入DispatcherServlet,Springboot向外界提供web服务,底层依赖了springframework中的we
 最新springboot中必须要了解的自动装配原理本文给大家介绍springboot中必须要了解的自动装配原理,spring-boot-dependencies:核心依赖都在父工程中,这个里面主要是
 SpringBoot项目引入第三方sdk jar包的解决方案这篇文章主要介绍了SpringBoot项目引入第三方sdk jar包,个人感觉比较好的解决方案是将jar上传到本地的maven仓库,然后
 SpringBoot超详细讲解集成Flink的部署与打包方法昨天折腾了下SpringBoot与Flink集成,实际上集成特简单,主要是部署打包的问题折腾了不少时间。想打出的包直接可以
 springboot实现公众号接收回复消息和超过5秒被动回本文主要介绍了springboot实现公众号接收回复消息和超过5秒被动回复消息,文中通过示例代码介绍的非常详细,具有一定的参